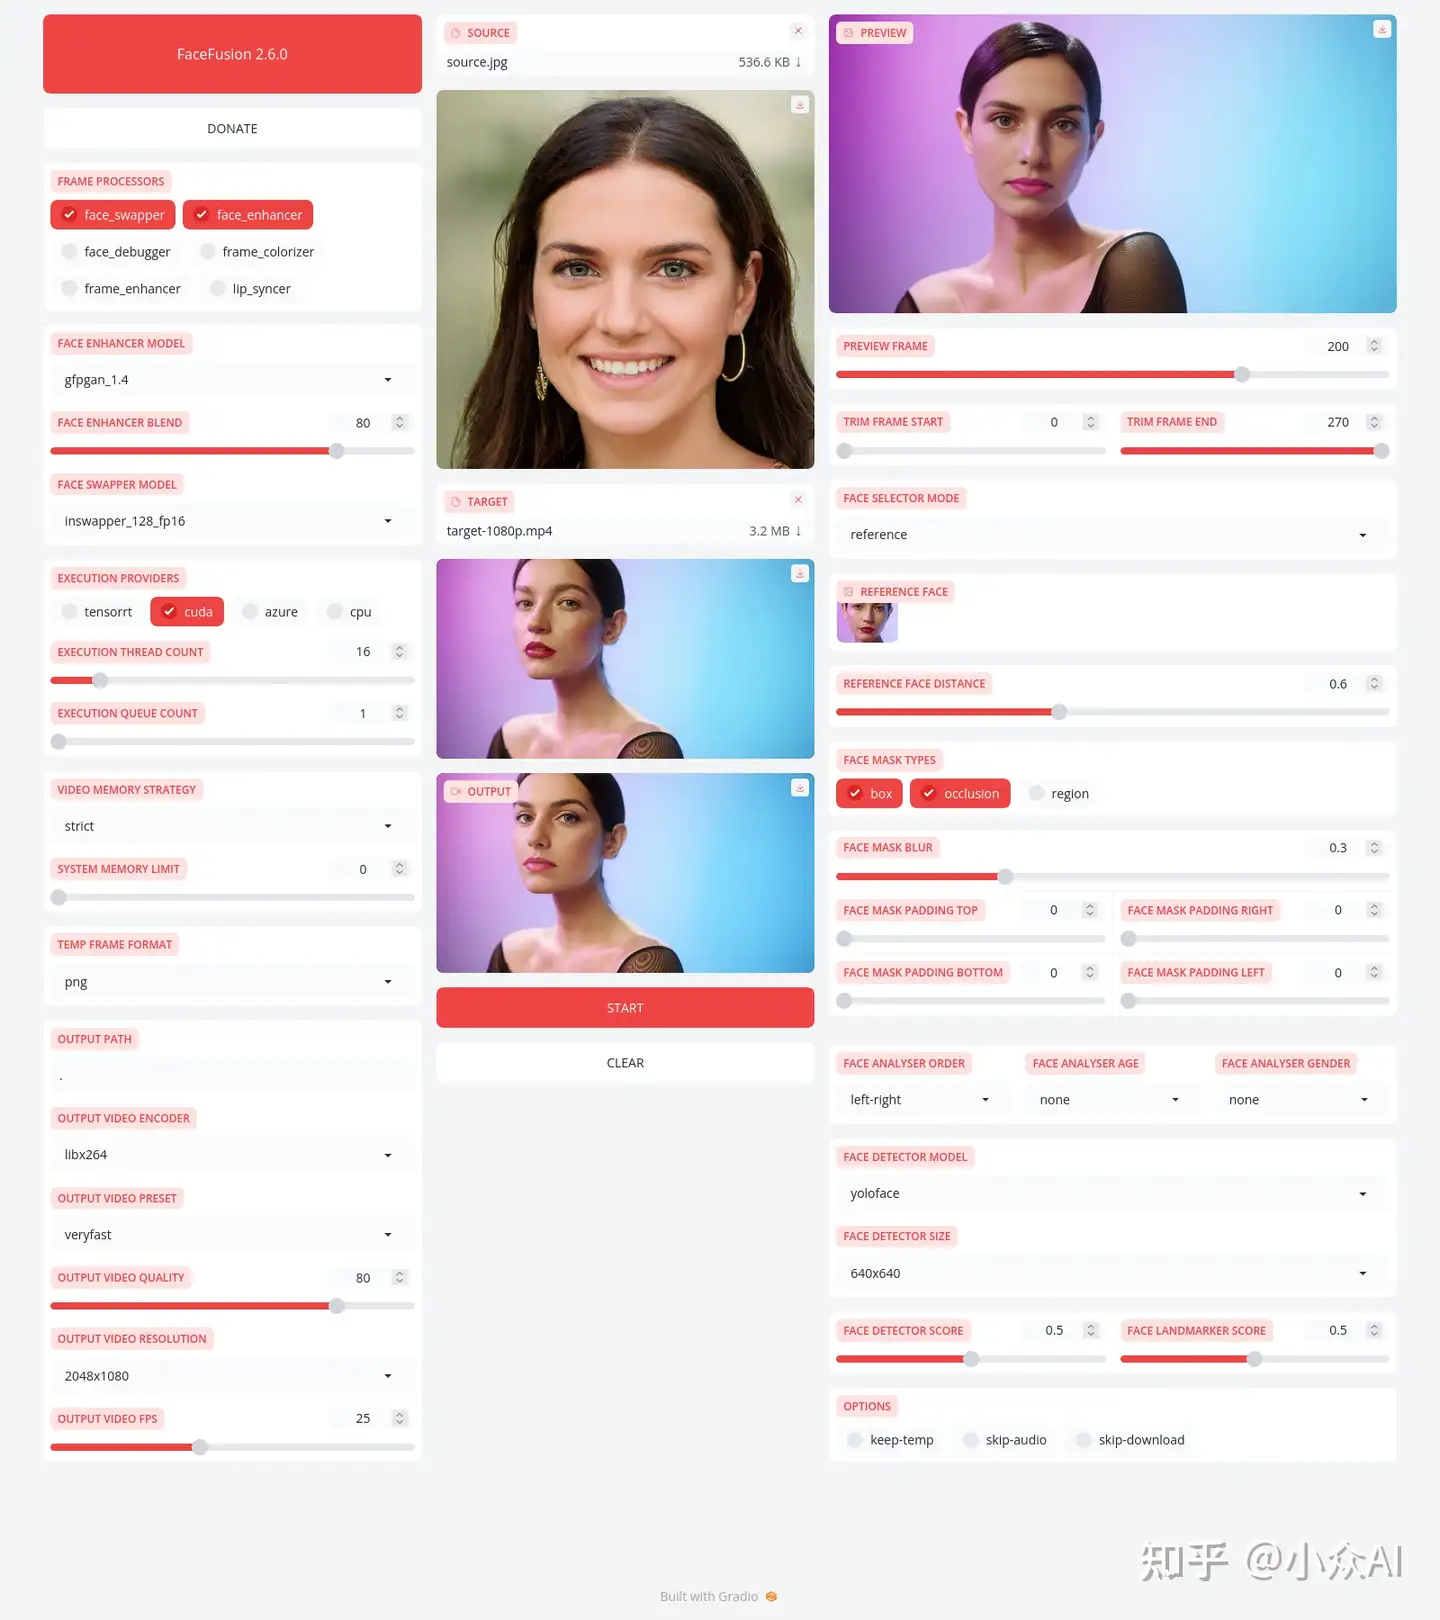
FaceFusion,全新一代AI换脸工具,无需安装,一键运行,可以完成去遮挡,高清化,卡通脸一键替换,并且Nvidia/AMD等显卡全平台支持。FaceFusion 新版新增了很多模型和高清算法,大大提高了图片和视频的换脸效果,同时还增加了三种遮罩功能,解决了脸部有污涤遮挡时融合效果差和跳闪的问题。本文将简要阐述如何使用Facefusion软件调整不同参数完成一键换脸,并附上最常用的换脸设置、遮罩功能的用法,以及替换高分辨率和卡通人脸的方法。
开始使用
Linux
- 安装依赖GIT/cURL/Conda/FFmpeg/Codec
apt install git-all
apt install curl
curl -LO https://repo.anaconda.com/miniconda/Miniconda3-latest-Linux-x86_64.sh
bash Miniconda3-latest-Linux-x86_64.sh
apt install ffmpeg
apt-get install mesa-va-drivers
- 安装运行环境
conda init --all
conda create --name facefusion python=3.10
conda activate facefusion
MacOS
- 安装依赖GIT/Conda/FFmpeg
brew install git
brew install miniconda
brew install ffmpeg
- 安装运行环境
conda init --all
conda create --name facefusion python=3.10
conda activate facefusion
Windows
- 安装依赖GIT/Conda/FFmpeg/Codec
 winget install -e --id Git.Git
 winget install -e --id Anaconda.Miniconda3 --override "/AddToPath=1"
 winget install -e --id Gyan.FFmpeg
 winget install -e --id CodecGuide.K-LiteCodecPack.Basic
- 安装运行环境
conda init --all
conda create --name facefusion python=3.10
conda activate facefusion
运行Facefusion
python run.py [options]
options:
-h, --help show this help message and exit
-s SOURCE_PATHS, --source SOURCE_PATHS choose single or multiple source images or audios
-t TARGET_PATH, --target TARGET_PATH choose single target image or video
-o OUTPUT_PATH, --output OUTPUT_PATH specify the output file or directory
-v, --version show program's version number and exit
misc:
--force-download force automate downloads and exit
--skip-download omit automate downloads and remote lookups
--headless run the program without a user interface
--log-level {error,warn,info,debug} adjust the message severity displayed in the terminal
execution:
--execution-providers EXECUTION_PROVIDERS [EXECUTION_PROVIDERS ...] accelerate the model inference using different providers (choices: cpu, ...)
--execution-thread-count [1-128] specify the amount of parallel threads while processing
--execution-queue-count [1-32] specify the amount of frames each thread is processing
memory:
--video-memory-strategy {strict,moderate,tolerant} balance fast frame processing and low VRAM usage
--system-memory-limit [0-128] limit the available RAM that can be used while processing
face analyser:
--face-analyser-order {left-right,right-left,top-bottom,bottom-top,small-large,large-small,best-worst,worst-best} specify the order in which the face analyser detects faces
--face-analyser-age {child,teen,adult,senior} filter the detected faces based on their age
--face-analyser-gender {female,male} filter the detected faces based on their gender
--face-detector-model {many,retinaface,scrfd,yoloface,yunet} choose the model responsible for detecting the face
--face-detector-size FACE_DETECTOR_SIZE specify the size of the frame provided to the face detector
--face-detector-score [0.0-1.0] filter the detected faces base on the confidence score
--face-landmarker-score [0.0-1.0] filter the detected landmarks base on the confidence score
face selector:
--face-selector-mode {many,one,reference} use reference based tracking or simple matching
--reference-face-position REFERENCE_FACE_POSITION specify the position used to create the reference face
--reference-face-distance [0.0-1.5] specify the desired similarity between the reference face and target face
--reference-frame-number REFERENCE_FRAME_NUMBER specify the frame used to create the reference face
face mask:
--face-mask-types FACE_MASK_TYPES [FACE_MASK_TYPES ...] mix and match different face mask types (choices: box, occlusion, region)
--face-mask-blur [0.0-1.0] specify the degree of blur applied the box mask
--face-mask-padding FACE_MASK_PADDING [FACE_MASK_PADDING ...] apply top, right, bottom and left padding to the box mask
--face-mask-regions FACE_MASK_REGIONS [FACE_MASK_REGIONS ...] choose the facial features used for the region mask (choices: skin, left-eyebrow, right-eyebrow, left-eye, right-eye, glasses, nose, mouth, upper-lip, lower-lip)
frame extraction:
--trim-frame-start TRIM_FRAME_START specify the the start frame of the target video
--trim-frame-end TRIM_FRAME_END specify the the end frame of the target video
--temp-frame-format {bmp,jpg,png} specify the temporary resources format
--keep-temp keep the temporary resources after processing
output creation:
--output-image-quality [0-100] specify the image quality which translates to the compression factor
--output-image-resolution OUTPUT_IMAGE_RESOLUTION specify the image output resolution based on the target image
--output-video-encoder {libx264,libx265,libvpx-vp9,h264_nvenc,hevc_nvenc,h264_amf,hevc_amf} specify the encoder use for the video compression
--output-video-preset {ultrafast,superfast,veryfast,faster,fast,medium,slow,slower,veryslow} balance fast video processing and video file size
--output-video-quality [0-100] specify the video quality which translates to the compression factor
--output-video-resolution OUTPUT_VIDEO_RESOLUTION specify the video output resolution based on the target video
--output-video-fps OUTPUT_VIDEO_FPS specify the video output fps based on the target video
--skip-audio omit the audio from the target video
frame processors:
--frame-processors FRAME_PROCESSORS [FRAME_PROCESSORS ...] load a single or multiple frame processors. (choices: face_debugger, face_enhancer, face_swapper, frame_colorizer, frame_enhancer, lip_syncer, ...)
--face-debugger-items FACE_DEBUGGER_ITEMS [FACE_DEBUGGER_ITEMS ...] load a single or multiple frame processors (choices: bounding-box, face-landmark-5, face-landmark-5/68, face-landmark-68, face-landmark-68/5, face-mask, face-detector-score, face-landmarker-score, age, gender)
--face-enhancer-model {codeformer,gfpgan_1.2,gfpgan_1.3,gfpgan_1.4,gpen_bfr_256,gpen_bfr_512,gpen_bfr_1024,gpen_bfr_2048,restoreformer_plus_plus} choose the model responsible for enhancing the face
--face-enhancer-blend [0-100] blend the enhanced into the previous face
--face-swapper-model {blendswap_256,inswapper_128,inswapper_128_fp16,simswap_256,simswap_512_unofficial,uniface_256} choose the model responsible for swapping the face
--frame-colorizer-model {ddcolor,ddcolor_artistic,deoldify,deoldify_artistic,deoldify_stable} choose the model responsible for colorizing the frame
--frame-colorizer-blend [0-100] blend the colorized into the previous frame
--frame-colorizer-size {192x192,256x256,384x384,512x512} specify the size of the frame provided to the frame colorizer
--frame-enhancer-model {lsdir_x4,nomos8k_sc_x4,real_esrgan_x2,real_esrgan_x2_fp16,real_esrgan_x4,real_esrgan_x4_fp16,real_hatgan_x4,span_kendata_x4} choose the model responsible for enhancing the frame
--frame-enhancer-blend [0-100] blend the enhanced into the previous frame
--lip-syncer-model {wav2lip_gan} choose the model responsible for syncing the lips
uis:
--ui-layouts UI_LAYOUTS [UI_LAYOUTS ...] launch a single or multiple UI layouts (choices: benchmark, default, webcam, ...)
Windows一键式安装
官方提供了Windows一键式包,需要20美元购买。FaceFusion: Windows Installer
- 自动执行 GIT、Conda 和 FFmpeg 安装
- 选择您的加速器(AMD、Intel、NVIDIA)
- “开始”菜单条目和桌面快捷方式
- 无需手动环境激活即可启动
- 简化卸载
GPU加速
确保你的电脑配置有独立的英伟达显卡
Linux
- 安装CUDA
conda install cudatoolkit=11.8 cudnn=8.9.2.26 conda-forge::gputil=1.4.0
- 安装OpenVINO
conda install conda-forge::openvino=2023.1.0
Windows
- 安装CUDA
conda install cudatoolkit=11.8 cudnn=8.9.2.26 conda-forge::gputil=1.4.0
- 安装OpenVINO
conda install conda-forge::openvino=2023.1.0