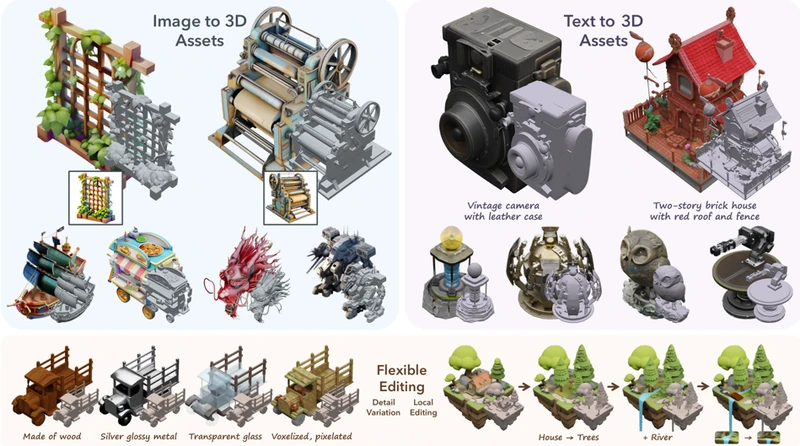
TRELLIS 是一个大型 3D 资产生成模型。它接收文本或图像提示,并生成各种格式的高质量 3D 资产,例如 Radiance Fields、3D Gaussians 和网格。TRELLIS 的基石是统一的结构化 LATent (SLAT) 表示,它允许解码为不同的输出格式,并为 SLAT 量身定制的整流变压器作为强大的支柱。我们在 500K 不同对象的大型 3D 资产数据集上提供具有多达 20 亿个参数的大规模预训练模型。TRELLIS 显著超越了现有方法,包括最近类似比例的方法,并展示了以前型号所没有的灵活输出格式选择和本地 3D 编辑功能。
主要功能
- 高质量:它以高质量生成具有复杂形状和纹理细节的各种 3D 资产。
- 多功能性:它接受文本或图像提示,可以生成各种最终的 3D 表示,包括但不限于辐射场、3D 高斯和网格,以适应不同的下游要求。
- 灵活编辑:它允许轻松编辑生成的 3D 资产,例如生成同一对象的变体或对 3D 资产进行本地编辑。
📦 安装和使用
先决条件
-
系统:代码目前仅在 Linux 上进行测试。对于 Windows 设置,您可以参考 #3(未完全测试)。
-
硬件:需要至少具有 16GB 内存的 NVIDIA GPU。该代码已在 NVIDIA A100 和 A6000 GPU 上得到验证。
-
软件:
安装步骤
-
克隆存储库:
git clone --recurse-submodules https://github.com/microsoft/TRELLIS.git cd TRELLIS -
安装依赖项: 在运行以下命令之前,需要注意一些事项:
- 通过添加 ,将创建一个名为 的新 conda 环境。如果要使用现有的 conda 环境,请删除此标记。
--new-envtrellis - 默认情况下,环境将使用 pytorch 2.4.0 和 CUDA 11.8。如果您想使用不同版本的 CUDA(例如,如果您安装了 CUDA Toolkit 12.2 并且不想安装另一个 11.8 版本进行子模块编译),您可以删除该标志并手动安装所需的依赖项。有关安装命令,请参阅 PyTorch。
trellis--new-env - 如果您安装了多个 CUDA Toolkit 版本,则应在运行命令之前将其设置为正确的版本。例如,如果您安装了 CUDA Toolkit 11.8 和 12.2,则应在运行命令之前运行。
PATHexport PATH=/usr/local/cuda-11.8/bin:$PATH - 默认情况下,代码使用 backend 进行关注。对于不支持的 GPU(例如 NVIDIA V100),您可以删除仅安装 (install only) 的标志,并将环境变量设置为在运行代码之前。有关更多详细信息,请参阅 最小示例。
flash-attnflash-attn--flash-attnxformersATTN_BACKENDxformers - 由于依赖项数量众多,安装可能需要一段时间。请耐心等待。如果遇到任何问题,可以尝试逐个安装依赖项,一次指定一个标志。
- 如果您在安装过程中遇到任何问题,请随时打开问题或联系我们。
创建一个名为 的新 conda 环境并安装依赖项:
trellis. ./setup.sh --new-env --basic --xformers --flash-attn --diffoctreerast --spconv --mipgaussian --kaolin --nvdiffrast运行.
setup.sh. ./setup.sh --helpUsage: setup.sh [OPTIONS] Options: -h, --help Display this help message --new-env Create a new conda environment --basic Install basic dependencies --xformers Install xformers --flash-attn Install flash-attn --diffoctreerast Install diffoctreerast --vox2seq Install vox2seq --spconv Install spconv --mipgaussian Install mip-splatting --kaolin Install kaolin --nvdiffrast Install nvdiffrast --demo Install all dependencies for demo - 通过添加 ,将创建一个名为 的新 conda 环境。如果要使用现有的 conda 环境,请删除此标记。
🤖 预训练模型
我们提供以下预训练模型:
| 型 | 描述 | #Params | 下载 |
|---|---|---|---|
| 格状图-大 | 大型图像到 3D 模型 | 1.2乙 | 下载 |
| TRELLIS-text-base | 基本文本到 3D 模型 | 342 米 | 即将推出 |
| 格状文本大号 | 大型文本到 3D 模型 | 1.1乙 | 即将推出 |
| 格子文本 xlarge | 超大文本到 3D 模型 | 2.0乙 | 即将推出 |
这些模型托管在 Hugging Face 上。您可以在代码中直接加载模型及其存储库名称:
TrellisImageTo3DPipeline.from_pretrained("JeffreyXiang/TRELLIS-image-large")
如果您更喜欢从本地加载模型,可以从上面的链接下载模型文件,并使用文件夹路径加载模型(应保持文件夹结构):
TrellisImageTo3DPipeline.from_pretrained("/path/to/TRELLIS-image-large")
💡 用法
最小示例
以下是如何使用预训练模型生成 3D 资产的示例。
import os
# os.environ['ATTN_BACKEND'] = 'xformers'   # Can be 'flash-attn' or 'xformers', default is 'flash-attn'
os.environ['SPCONV_ALGO'] = 'native'        # Can be 'native' or 'auto', default is 'auto'.
                                            # 'auto' is faster but will do benchmarking at the beginning.
                                            # Recommended to set to 'native' if run only once.

import imageio
from PIL import Image
from trellis.pipelines import TrellisImageTo3DPipeline
from trellis.utils import render_utils, postprocessing_utils

# Load a pipeline from a model folder or a Hugging Face model hub.
pipeline = TrellisImageTo3DPipeline.from_pretrained("JeffreyXiang/TRELLIS-image-large")
pipeline.cuda()

# Load an image
image = Image.open("assets/example_image/T.png")

# Run the pipeline
outputs = pipeline.run(
    image,
    seed=1,
    # Optional parameters
    # sparse_structure_sampler_params={
    #     "steps": 12,
    #     "cfg_strength": 7.5,
    # },
    # slat_sampler_params={
    #     "steps": 12,
    #     "cfg_strength": 3,
    # },
)
# outputs is a dictionary containing generated 3D assets in different formats:
# - outputs['gaussian']: a list of 3D Gaussians
# - outputs['radiance_field']: a list of radiance fields
# - outputs['mesh']: a list of meshes

# Render the outputs
video = render_utils.render_video(outputs['gaussian'][0])['color']
imageio.mimsave("sample_gs.mp4", video, fps=30)
video = render_utils.render_video(outputs['radiance_field'][0])['color']
imageio.mimsave("sample_rf.mp4", video, fps=30)
video = render_utils.render_video(outputs['mesh'][0])['normal']
imageio.mimsave("sample_mesh.mp4", video, fps=30)

# GLB files can be extracted from the outputs
glb = postprocessing_utils.to_glb(
    outputs['gaussian'][0],
    outputs['mesh'][0],
    # Optional parameters
    simplify=0.95,          # Ratio of triangles to remove in the simplification process
    texture_size=1024,      # Size of the texture used for the GLB
)
glb.export("sample.glb")

# Save Gaussians as PLY files
outputs['gaussian'][0].save_ply("sample.ply")
运行代码后,您将获得以下文件:
sample_gs.mp4:显示 3D 高斯表示的视频sample_rf.mp4:显示 Radiance Field 表示的视频sample_mesh.mp4:显示网格表示的视频sample.glb:包含提取的纹理网格的 GLB 文件sample.ply:包含 3D 高斯表示的 PLY 文件
Web 演示
app.py 提供了一个简单的 Web 演示,用于生成 3D 资产。由于此 demo 基于 Gradio,因此需要额外的依赖项:
. ./setup.sh --demo
安装依赖项后,您可以使用以下命令运行 Demo:
python app.py
然后,您可以在终端中显示的地址访问演示。